Origami rabbit cards for every occasion.

While living in Japan in the late ‘80s, I got really sick. Go-to-the-hospital sick.
When the doctor came in to review my x-rays, his expression was grave but I couldn’t understand what he was saying. (Even though I spoke Japanese, my medical vocabulary was, um, sparse.)
The one part I could make out was “gan mitai.” I knew that “mitai” roughly meant “looks like,” so I frantically paged through my Japanese–English Dictionary to find out what my illness ‘looked like.’
As is common with Japanese kanji characters, there were a bunch of different definitions for gan – wish, duck, alcove … even gun. But I was fairly certain which kanji he meant.
Cancer.
So I did what anyone in their early 20s would do when they’ve just been told they have cancer: I got a second opinion.
Turns out I just had a bad case of pneumonia, but I was still laid up for a couple weeks.
To help with my recovery, a gaggle of adorable grade-school girls gifted me with a true labor of love – folding and stringing together 1,000 origami cranes. Called senbazuru (sen = 1,000, tsuru = crane), they are believed to bring good luck or health.
Since tradition says the good luck and health is intended for the person who actually folds the cranes, the girls insisted I learn how to make at least one. So they taught me. Very patiently.
And thus my love for origami was born.
It’s a love I tried to pass on to my son. Problem was I wanted him to start with something easy, like a three-fold mouse, but of course he was only interested in making the 35-fold T-Rex. This aspect of his personality helps explain why I’ve been unable to help him in math since he was 5. It also helps explain why, 25 years after returning from Japan, I still have 500 sheets of origami paper stacked in my craft cabinet.
So when I saw this charming handmade Year of the Rabbit card at NotMartha.org (made by Matthew Moore), I knew it was destiny:

I was born in a year of the rabbit — and had all the supplies on hand? This project was definitely a no-brainer for me.
If you are among those who would consider sending a New Year’s card in March unfashionably late (although the Year of the Rabbit didn’t even officially begin until Feb. 3), this can also make an Easter card. Or place cards, anniversary/wedding cards, birthday cards, good luck cards, etc.
It’s pretty much a bunny for all occasions.
I first tried replicating the inspiration card, but couldn’t quite capture the cool, slightly quirky Asian calligraphy vibe. Mine ended up looking more like a botched third-grade art project.
So I made up my own cards using scraps I had on hand, like this red and tan gingham wrapping paper:

Gingham Origami Rabbit Card – View #1
 Gingham Origami Rabbit Card – View #2
 Gingham Origami Rabbit Card — Message
My origami paper came in two sizes — 4.5” and 5.75” — so those are the dimensions I used when cutting the other paper, but any size square will work. You can also use any paper you’d like – newsprint, wrapping paper, computer paper, etc. – but thinner paper is easier to work with.
These graphic B&W origami rabbits came together quickly from IKEA and Hobby Lobby wrapping paper remnants:

Origami Rabbits from wrapping paper
Print your own paper. For my brother’s upcoming anniversary, I used my favorite free typewriter font to print ‘custom’ origami paper on regular printer paper. I then cut the paper into 5.5-inch squares and voila! — an easy, no-cost way to personalize their card:
 Personalized origami anniversary card – Front
 Personalized origami anniversary card – Inside
Place cards & name tags. Brightly colored origami rabbit place cards would be fun for an Easter party or egg hunt:
 Origami Rabbit Place Cards
I had some patterned card stock left over from my wedding, so I decided to put it to use as a birthday card for a friend whose signature colors are brown and green. The white origami rabbit is made from a scrap of textured Japanese rice paper. (The other rabbit I attempted from the card stock remnants turned out okay, but proved my theory that thinner is better — at least when it comes to origami paper).
 Rice-paper Origami Rabbit All-Occasion Card
The ‘pressed for time’ collection. Every time I go to the store to buy cards, I get sticker shock. $4.59 for a greeting card? No thank you. But the 99-cent cards are so cheap and cheesy, I often leave the store empty-handed.
I created a quick Word template with a thought bubble that I can personalize for nearly any occasion. Add an origami rabbit and I’m done:
 More ideas: Easter, Birthday, Farewell and Good Luck cards
There are many ways to tweak this to make it your own, but I really like the abstract, back-of-the-bunny version – clean, simple, modern and a bit tongue-in-cheek. (Which means that some people will have no idea it’s supposed to be a rabbit.)
It is one of the simpler origami projects I’ve attempted, and I’m guessing it would be fun even for young-ish children.
So happy Year of the Rabbit. And happy folding…
Instructions. (Adapted from these.)
1. Position paper square (patterned or colored side down) like a diamond. Fold the bottom point up to the top and crease to make a triangle:

2. Fold the left point of the triangle to the right, then unfold. (This creates the crease you’ll use to align the ears.)

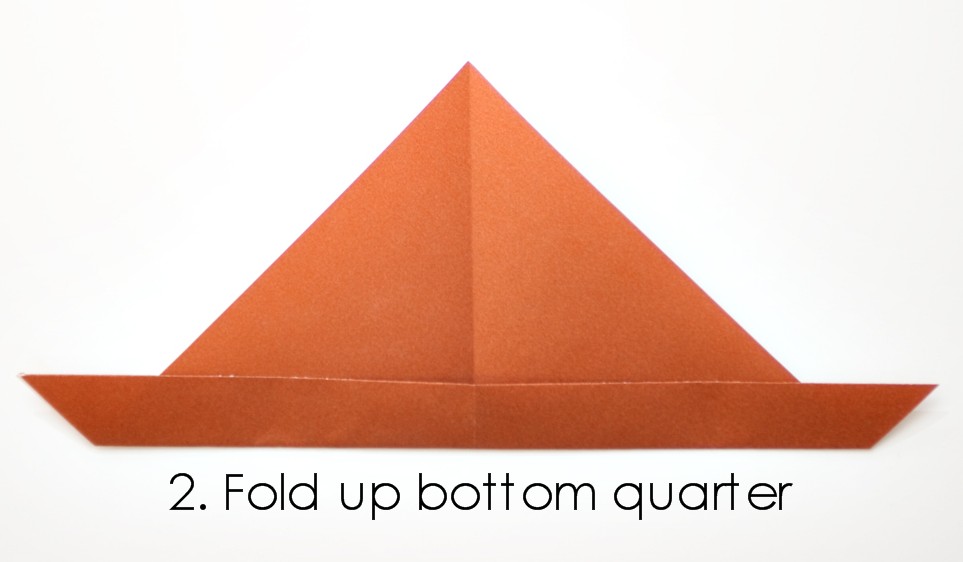
3. With point of triangle facing up, fold the bottom edge up about a quarter of the way. (This determines the size of the ears, so you may want to experiment first with some scrap paper to see how big/small you want the ears to be.)

4. Fold the bottom left up and in, toward the center crease; press firmly to create a fold.

5. Repeat with the right side. You may want to align them to help the ears match up — as I clearly did not:

6. Fold the lower tip up to form the flat bottom of the rabbit and glue or tape into place. This makes it easier to attach to the card. (If using thicker paper, it helps to first glue or tape the center to ensure it stays together when folding up the bottom.)

7. Flip the rabbit over and attach tail to bottom center using glue stick. I used a hole punch to make the tails from some leftover card stock and foam scraps. Circle stickers or tiny white pom poms could also work if you are so inclined.

8. Attach rabbit to card of choice.

***************************************
Photo credits:
Images © 2011 Christopher Halloran Photography.
“Happy New Year Card” from Megan at notmartha.org.


There’s a certain sweet simplicity to your funny little bunnies. I really like them.
Glad to hear it! But be careful if you start making them — they’re oddly addicting (since they’re so easy) so they tend to multiply like their real-life counterparts… xo
I had spaced the fact I was hosting my daughter’s co-op preschoo today and was happy I had seen this last night! It was the perfect, low-prep, fun project to do with four almost-five-year-olds. Thanks so much! Their rabbits were darling out of some pink/aqua/brown/green/white wrapping paper I had. They pasted them on green cardstock cards and wrote notes to their parents. Your ideas (especially the placecards!) are so simple and fabulous!
So glad they worked out! I didn’t test-market these on the under-5 crowd (or *anyone* for that matter), so it’s good to hear it wasn’t a disaster. That color combo sounds perfect, too.
I loved this post so much that I decided to keep my 3 year old son entertained tonight while mom was making dinner. I couldn’t find any origami paper, so I took a page from your book and made my own fun paper! I made a cute polka dot pattern in Paint (http://i53.tinypic.com/6hu7ba.jpg) and printed out a sheet. Dillon and I made 2 cute bunnies (http://i55.tinypic.com/166f8ya.jpg) that we plan to give to mom in an Easter card. Thank you so much for your idea! Dillon and I loved it!
Jason — I love that you made this with Dillon, and love even more that you made it your own! Your polka dot paper is perfect and the tails are so sweetly handmade. Thanks for including the photos — great to see the many ways these can be interpreted. Happy (early) Easter!
Adorable. Creative. Genius.
I am having a spring craft linky party and giveaway on my blog this Friday. I would love for you to showcase this wonderful project.
Details are on my blog today.
Oh my goodness these are adorable!! I am so glad that I found your blog!
Thank you, Alicia — glad I found yours, too! (Think I need to try that oat/citrus scrub…)
I love these ideas, and I am trying to create unique wedding invitations for my wedding. Can you tell me where you got your cardstock for your wedding that you used to make the Rice-paper Origami Rabbit All-Occasion Card?
Hi, Robin — I bought the 12″ x 12″ card stock at a local scrapbook store, Scrapbooks, Etc.. It’s made by American Crafts from the “a la Carte — truly inspiring” line: Artichoke #34204. Best wishes for your wedding!